


I. Introduction
1. Foreword
2. Hero Stats
3. Quick Overview
II. Skill Information
1. Hero Skills
2. Skill Overview
3. Skill Build
4. Justification for Skill Build
III. Item Build
1. Introduction to Item Build
2. Core Item Build
3. Core Item Build Justification
4. Items after Core Build
5. Justification for Items after Core Build
6. Rejected Items
IV. Strategy
1. Early Game
2. Mid Game
3. Late Game
V. Using Nether Swap
1. Basic Nether Swap Information
2. The Purpose of Nether Swap
3. Who do I Swap?
4. Stun + Swap VS. Swap + Stun
5. Tower Swap
6. Save Swap
VI. Miscellaneous Information
1. Replays
2. Conclusion
3. Acknowledgements
4. Changelog
1. Foreword
This guide has come a long way since the 3rd HGC. This is my first guide that I take pride in and I hope it will change how people play VS. The main focus of my guide is for a more competitive setting like scrims and inhouses. I will warn you from this point on so please read this before you move on; you will not get godlike by following this guide. What you will get instead is heightening your chance of winning the game for your team. So I recommend against using this build if you're in a pub game. The important thing with my build and strategy is teamwork. In pubs, teamwork rarely exists so you'll be frustrated because you'll die horrible deaths because of your noob teammates and you can't do a thing without your teammates taking advantage of your support. This guide is more of an introductory guide towards players who wants to play VS in scrims and league games. No one starts off as a pro and this guide will help those people to step up their game from pub/tda to scrims/league games.
This guide is now updated for 6.43b and as such, I have also changed the concept a little from a ganker/support hero early to mid game to a backup carry hero late game. I hope to find a middle ground between those who plays a pure support VS and pure DPS VS into a more balanced gameplay that will hopefully prove to be more effective. Now, let’s move on to the real stuff.
2. Hero Stats
Base movespeed is 295.
Base STR is 16 + 1.8 per level.
Base AGI is 22 + 2.35 per level.
Base INT is 15 + 1.75 per level.
Base Damage is 34-48.
Base HP is 454.
Base Mana is 195.
Base Armor is 3.1
Attack Range is 400.
3. Quick Overview
Her stats are weak and mediocre at best, not as good as jakiro’s stats, but definitely better than weaver. She has decent starting armor, soso range, slightly below average movement speed, and somewhat average base damage. One of her biggest disadvantage is the fact that she can't use blink dagger, or rather, she drops it after one use to prevent abuse. With only a 1.75 second stun and swap which can only be an escape mechanism under certain circumstances, not being able to use blink makes it tough for VS.
To make up for her mediocre hero stats, her skills are simply great. Magic missile is a high damage stun/nuke that makes her potent early game; command aura is a great skill that helps you push and deal damage. Terror is great contrary to popular belief because it goes hand in hand with your command aura and boosts your teams’ survival to some extent and nether swap is perhaps one of the best team skill there is.
One quick look at her skills tells people two different things. A high damage stun nuke with nether swap screams out GANK and with that, she naturally became a support hero in the sense that she exclusively ganks and buys wards. On the other spectrum, a damage boosting aura and a skill that lowers armor screams out CARRY, mostly in pubs and lower level inhouses. Hopefully with this guide, I can find a middle ground that incorporates both aspects, fully utilizing her powerful early and mid game while salvaging her late game so that she can keep up with the game’s pace and hopefully not just feed horribly in every team battles.
II. Skill Information
1. Hero Skills
Magic Missile
A magic missile is thrown at an enemy unit, causing damage. Stuns for 1.75 seconds.
Level 1 – 100 damage
Level 2 – 175 damage
Level 3 – 250 damage
Level 4 – 325 damage
Mana cost: 95 / 110 / 125 / 140. 10 second cooldown at all levels.
Terror
Shendelzare lets loose a wicked cry, terrorizing nearby enemy units. Their armor and damage are reduced.
Level 1 – Reduces base armor by 2 and damage by 5%
Level 2 – Reduces base armor by 3 and damage by 10%
Level 3 – Reduces base armor by 4 and damage by 15%
Level 4 – Reduces base armor by 5 and damage by 20%
40 mana cost and 15 second cooldown at all levels.
Command Aura
Increases nearby units’ damage.
Level 1 – 12% damage
Level 2 – 20% damage
Level 3 – 28% damage
Level 4 – 36% damage
Nether Swap
Instantaneously swaps positions with a target Hero.
Level 1 – 600 range
Level 2 – 900 range
Level 3 – 1200 range
Mana cost: 100 / 150 / 200. 45 second cooldown at all levels.
2. Skill Overview
Like I explained in the quick overview section, her skills scream out two roles that conflicts with each other. Magic missile is a very potent stun, dealing above average damage all the while stunning your target. Going hand in hand with magic missile is nether swap, perhaps one of the best ganking spells in the game. Magic missile allows you to fulfill two things: nuking and chasing. Nether swap works with magic missile by immobilizing your target after a swap or swapping after a stun.
Command aura and terror allows her to be a damage dealer by boosting her damage and lowering the target’s armor. Terror creates a gap between VS and the target by lowering their armor and lowering their base damage. While both of them separately seem to be insignificant, a combination of two allows VS to easily overwhelm targets that are stronger than her.
While the two sets of skill do seem to be contradictory, they do work together nicely. Stun allows you to catch up to your target or create a gap in which you can deal more damage. Terror can also be used as a support skill, lowering your target’s damage and armor while your own damage dealer takes advantage of that gap terror creates. While it is somewhat silly to assume you will always stay in 300 range of your allies, command aura does have the possibility to boost your allies damage in a team fight, also fulfilling its role as a support.
3. Skill Build
Level 1 - Magic Missile
Level 2 - Stats
Level 3 – Magic Missile
Level 4 - Stats
Level 5 – Magic Missile
Level 6 – Nether Swap
Level 7 – Magic Missile
Level 8-10 - Stats
Level 11 – Nether Swap
Level 12-15 – Command Aura
Level 16 – Nether Swap
Level 17-20 - Terror
Level 21-25 - Stats
4. Justification for Skill Build
Maxing out magic missile first is a no brainer since it is your very own stun nuke.
Stats are gotten at level 2, 4, and 8-10 in place of command aura because there is no need to boost your damage by a small amount when it can be done with stats. Stats also gives you health and mana which you will desperately need early game. Also command aura affects your creeps, which makes them push farther into the enemy’s base.
Nether swap is gotten whenever it is possible. Command aura is maxed out next so your teammates and you can benefit from the 36% boost in damage during mid game when you won’t have to worry about pushing too far.
Terror is maxed out from 17-20 as it is most effective late game. It lasts around 20 seconds which is very nice and if done right it can affect all 5 of your opponents. My original opinion about terror was absolutely wrong; the AOE of terror is nice (around 700 or so I believe) and it works well with your command aura since terror reduces their armor whereas your command aura boosts your team’s damage.
I would like to emphasize that there should never be a variation in this skill build. Magic missile must be maxed out by level 7 and you absolutely need the stats early game more than command aura. Command aura comes first before terror and I believe getting terror earlier than level 17 is a waste. The only possible variation I would think of is getting more stat points from level 12~15 if you are having a very difficult game.
1. Introduction to Item Build
The main goal of my item build is to incorporate my basic concept: early ganker, late game damage dealer. With this build, your survivability and support as well as damage dealing elements are all fulfilled.
2. Core Item Build - Bracers
Circlet of Nobility x 3 - 185 gold x 3
Gauntlets of Strength - 150 gold x 3
Bracers recipe scroll - 175 gold x 3
+18 to strength
+9 to intelligence
+9 to agility
Total cost: 1530 gold - Hood of Defiance
Ring of Regeneration x 2 - 375 gold x 2
Planeswalker’s Cloak - 650 gold
Helm of Iron Will - 950 gold
+30% magic resistance
+8 HP regeneration
Total cost: 2,350 gold - Boots of Travel
Boots of Speed - 500 gold
Boots of Travel recipe scroll - 2,200 gold
+90 movement speed
Active ability: Teleport to any ally unit, excluding ally heroes, 60 second cooldown
Total cost: 2,700 gold
3. Core Item Build Justification
The three bracers early on will take care of any mana problems you will encounter and most of all, offer a cheap boost to HP. The agility boost is also very nice. You need exactly three, no more, no less. The pieces are all very small so you can get them on your chicken and have a consistent boost instead of waiting for one big item.
Hood of defiance is the next logical choice. It offers 30% magic resistance, boosting your survivability up a notch, making you beefy and hard to take down. So with the bracers and hood of defiance, we have taken care of our HP problem and nuke problem. Next is taking care of our mobility and map control. BOT allows you to move around the whole map to participate in quick team battles and ganks, all the while allowing you to jump lanes to farm and escape ganks and it allows you to push and defend. BOT quickly takes care of everything you need all in 2,200 gold (you always need boots so I took off 500).
4. Items after Core Build - The Butterfly
Eaglehorn - 3,400 gold
Quarter Staff - 1,150 gold
The Butterfly recipe scroll - 1,800 gold
+30 agility
+30 damage
+30% increased attack speed
30% evasion
Total cost: 6,350 gold - Assault Cuirass
Plate Mail - 1,400 gold
Hyperstone - 2,300 gold
Chainmail - 620 gold
Assault Cuirass recipe scroll - 2,000 gold
+10 armor
+5 armor aura
+40% attack speed
+15% attack speed aura
-5 armor aura
Total cost: 6,320 gold
5. Justification for Items after Core Build
The Butterfly is the best item on VS for two reasons: huge improvement in DPS and survivability. The +30 agility boost works with your command aura, giving you a total of 41 damage (I rounded up, correct me if this is the wrong way to calculate damage). So that’s +71 damage, +60% attack speed, and the best part, 30% evasion. This item takes care of every problem VS faces in dealing damage. It gives her good damage, improves her low attack speed, and improves her survivability with the evasion. With the HP from bracers, magic resistance from hood of defiance and the evasion from the butterfly, your survivability has been taken care at every possible way.
Your build should have ended at the butterfly or even earlier at BOT, but in case the game drags on, the assault cuirass is the next best option. The assault cuirass takes care of your survivability and damage, just like the butterfly. The armor helps you take physical damage and the attack speed improves your DPS. The -5 armor aura works with terror, reducing a total of 10 armor to everyone around you, making it one of the best luxury item you can get.
6. Rejected Items - Lothars Edge
Lothars edge works only a few times, after that your opponents will grab some sort of true sight to counter your windwalk, making it almost useless. You pay a big chunk of your money on the windwalk and wouldn’t you feel awful when you pay for nothing? The agility boost and damage boost is hardly any good considering the huge price tag. You can do better than this. - Eye of Skadi
Great stat benefits and consistent and useful orb effect. But why avoid it? Skadi is great when you can finish it. However, this item is too expensive and while I do have other expensive items in my build, those two items are cheaper than eye of skadi and they work much better in the sense that they boost your survivability and damage without any unwanted benefits. Eye of skadi gives you a good boost to HP, damage, and mana but why do you need that huge boost to mana? The frost orb works but you already have two spells that takes care of anyone that tries to run away so why do you need the slow? You’re better off with a butterfly or assault cuirass after your core build. - Mekansm
Mek is great in the sense that it gives you a quick 250 HP AOE heal. But guess what? You’re strained for mana using magic missiles and nether swap during early to mid game. It is kind of funny I use the mana argument to go against eye of skadi yet I use the same argument but I flip it over to say I don’t have enough mana to use the AOE heal. However, here’s the thing. Eye of skadi can be completed mid/late game when your mana problems are no longer existent and mek is the most effective from early/mid game. You will suffer mana problems IF you get the mek and by the time mana won’t be a problem, mek’s efficiency has just dropped a notch. You’re better off letting someone else get a mek and work on quick HP boosters. - Heart of Tarrasque
With aegis gone, many people would think that HOT is the best item to get for VS. After all, a 1k boost to HP sounds good for a hero who does swaps right? Well my answer lies in my strategy. With this guide, you will no longer do “suicide swaps” late game. HOT would be great if you’re going to continue just swapping but now this guide will cover a new aspect where you will be a backup carry in your games.
1. Early Game
Frankly I don’t care what you get at the start. I usually get tangos for uninterrupted, fast healing and 5 ironwood branches. There are times when I get chicken, but usually THD or chen gets it. IF you want, you can grab a RoR to use it as an ingredient for your hood of defiance, but I'm too used to grabbing tangos and branches but it's personal preference.
After buying your starting items, head out to the top lane or bottom lane. Middle lane is usually for your team’s solo hero and generally not advisable for VS. Do not solo but pair up with a disabler like rhasta or another stunner like tiny or sven. Your stun is far more valuable with another teammate and so is your nether swap. I can’t emphasize how important it is to grab the right lane partner. You just don’t have the power to protect a late game hero such as PA or troll and you suck as a solo. You shine the most with a disabler, nuker, and a stunner.
ESTABLISH LANE CONTROL. Your stun paired with another stun or disable rapes. If your opponents are melee, never let them farm. Keep whacking them whenever they get near. Stun and combo them to death or send them to the fountain. Make sure they fear you and make them cry.
The story changes when you’re against two ranged nukers/combo’ers. Play conservatively by staying behind the ranged creep. Only move up once to last hit a creep or deny. Then quickly move back so they can’t harass you or initiate a combo. If you see one of them moving up towards you, be quick and STUN. Usually one stun is enough to deter their combo and perhaps even turn the tables so you and your lane partner can start your combo.
If you’re forced to solo or pair up with a late game hero, just cry and hope you don’t have to face something horrible like QOP and abaddon. If your opponents are shitty late game heroes like PA, be relieved and just farm, with the occasional harassment. If your opponents are somewhat decent but not enough to combo kill you, then farm safely. If you have to face strong lane controllers then just cry. Hug hug hug your tower. Make denying your priority so that you don’t push. Ask your teammates to gank your lane. However in most inhouses and scrims, this scenario will rarely happen if you guys are even remotely smart.
Before level 6, your goal is to chain two stuns together with your ally. It’s common sense, but make sure both of you focus on the same hero. Dispersing your nukes on two of them is a very bad idea. Also remember to animation cancel. When VS lets out a stun, she tends to stand around and look pretty. After giving the command to stun, immediately move forward. This will give you the opportunity to kill.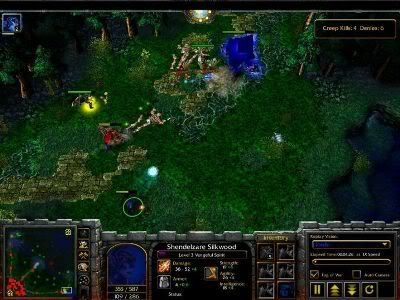
You can see an opportunity for FB in this screenshot. I stun to catch enigma falling behind.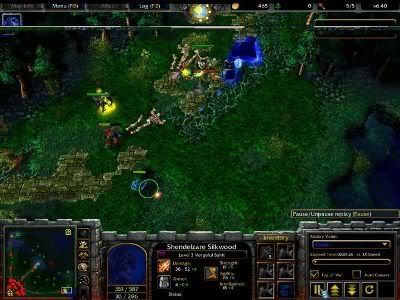
This screenshot shows you the power of animation cancelling. Apart from stunning at the right moment, animation cancelling is crucial as it lets you get more hits in. Try and compare it with the first screenshot. You can see that I moved even before the stun actually hits enigma.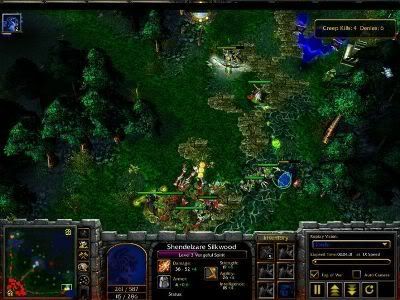
Now see where I am in this screenshot. Compare it with the second screenshot. The distance between enigma and me is virtually the same as before. The only difference is I was able to squeeze in one or two hits while still maintaining the same distance. This shows you that animation cancelling is not solely applicable to spells, it is applicable to hitting also. The trick is to right click on your target, and immediately right click on the ground to move towards your target. If done correctly, you’ll be hitting your target AND be able to chase efficiently. Needless to say, drow was able to get the last hit in and get FB. If I didn’t animation cancel, enigma might’ve been able to run away with a sliver of his life left.
When you hit level 6, that’s when your opportunity for a sure kill arises. Stun and swap is a very powerful combo with your ally. The screenshots below will show how it works.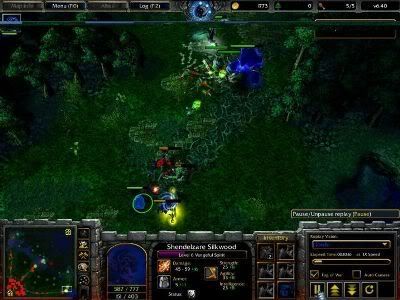
This screenshot was taken before swap. You can see enigma harassing drow with stun and a couple of hits. What he fails to realize however, is that he was in swap range and I was in tower range.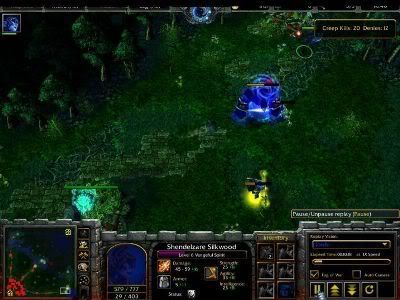
Here you can see enigma swapped, stunned, and getting hit by drow, the tower, and me. Poor medusa can’t do anything here. This is precisely how you abuse swap. Moments like this are what you have to be looking out for. If you see an opportunity, don’t hesitate to catch it and take advantage.
If no one gets wards on your team, it's your job to provide wards for map control. This is especially important for VS as she needs to constantly gank around. Put the wards on the river and for mid lane, on the hill so they can have vision. I recommend viewing my earlygamevs replay; I whored wards all game long and you'll see how much of a difference it makes as we gain the upper hand in the game.
2. Mid Game
Now comes the tricky part: how do we gank while farming up for late game? The answer is a balance of both, ganking whenever you see an opportunity, yet increasing your farming time more than you did with the conventional support VS. Now items are a bigger priority than just purely ganking so farm while you can and gank whenever your team calls for it or you see an opportunity.
There are five things you need for a successful gank.
1. WARDS WARDS WARDS. You need wards for three things. The first thing is knowing where your opponents are. A bad way to end a gank is by dying by a counter gank. Having vision of enemy heroes approaching to help your target will help you so many times that the observer wards will pay for itself. You always want to escape a sticky situation by anticipating a counter gank. The second thing it helps with is vision for swapping. Do you notice how it gets really dark and you can't see far ahead? Well that really screws up your swaps, especially going up the hill towards the middle lane. Just pluck down a ward and gain full vision of that area for a surprise swap. However, don't spend TOO much on wards, your team should be helping out on the cost. And the 3rd reason is...
2. RUNES. Grabbing a rune will help with your ganking tenfold. And what helps you grab runes? Vision of the river with the aid from wards. Every single rune will help you in ganking. Double damage rune helps you take down your target fast; invisibility rune helps you surprise your opponent by popping out with a hit and stunning and then finishing it off with a swap when they run away. Haste rune will help you move up for that stun and swap, and no one will be able to run away from you when you're hasted. You can grab the illusion rune to help you take down your opponents or send it in first so that it tanks the tower for you and grabbing a regen rune after a gank lets you fully charge up for another round of fun ganking.
3. Coordination from your allies. You are not a solo killer. Using swap means nothing if there's no one on the other side to greet that person. You do not want to waste a stun or disable by using them right away, you would want to stun first, whack a few times, swap, have your ally disable, whack some more, and finish it off with another stun if he's still alive. You do not want to stun and have your ally immediately stun/disable him, wasting the initial stun duration. All of this requires coordination and practice with the people you play with. That's one of the reasons why this guide is more suited towards inhouses and scrims where the people that are on your team are people you can trust and played with before.
4. Animation canceling and proper positioning. This is perhaps one of the most important part of VS that you need to know. When you stun your target, you need to move forward instead of just standing there and hitting him. You want to move to a spot where he would most likely run so that you can land more hits in and then swap when he's about to run away. If you're with an ally, this will prove to be very useful as he can't run to your ally and that only leaves him with one choice, and that is running past you which helps you land more hits and eventually swapping him for the win.
5. Avoid tower diving. Even I do this and it has landed me into alot of troubles. Do not be greedy with kills, if it seems like a lost cause then back off and look for another opportunity. If your target is tower hugging or off to his base healing, then you have done your job of weaking your opponents and letting your allies farm.
Nether swap should be used for ganking and only in special circumstances in team battles which will be covered later. Whenever you're not ganking, try your best to farm up so you can get your damage items. Neutrals are a good option since you have +8 HP regeneration from the hood of defiance so sweep through neutrals if you must.
3. Late Game
Late game your role has changed significantly. Swap is now pushed down as a chaser and picking off lone heroes or late game ganking. Other than that, there will be no such thing as suicide swapping. Suicide swapping worked with the conventional support VS because trading lives was worth it. Late game support VS really can't do much, making it worthy to swap out a low worth hero for someone who can do alot of damage in team battles on your opponent side. The basic idea is this: do not swap if all 5 heroes are all bunched up and ready for anything. Swap should be used to catch someone by surprise, like a lone hero lagging behind or a hero who thinks he's hiding in fog of war when you actually warded that area, taking him out first and then moving on to your other targets. If you guys are planning on ganking first and then pushing, swap is worth it since no matter how prepared your opponents are, covering a grand total of 1200 distance can quickly take care of your target.
If you've followed my build, then you should have your core items and the butterfly. By getting the butterfly, you are now able to dish out decent damage. Play like a typical carry hero. Stay behind your tanks but don't be the last one in and first one out. You are still supportive meaning your carry hero should be the one who gets in last and gets out first. Use your stun to stop potentially devastating channeling ultimates like epicenter and freezing field. If there are none then use it to immobilize a target for your teammates to munch on. Use terror so that your DPS is boosted and use swap whenever you're picking off heroes after winning a team battle.
1. Basic Nether Swap Information
Swap is one of the most versatile skill in game and also very dangerous to you or your team if used incorrectly. If it is pulled off at the right moment then it is a death sentence to whoever was swapped. If used incorrectly you will be killed while the person you swapped gets away.
Some things to know about nether swap:
- Nether swap goes through avatar so if you see a naix running away with avatar on then feel free to swap him in.
- Spell block doesn’t block nether swap. I THINK it only blocks the mini-stun since it triggers spell block CD. I would need clarification on this.
- Nether swap is a mini-stun so use it to interrupt channeling spells when your stun is in cooldown.
- Nether swap has a slight casting time but once it goes through the hero will get swapped even if he goes into fog of war or outside of your swap range.
- Nether swap can negate Panda’s split if used right before he uses it.
- Spiritbreaker’s nether strike will be negated if you swap him.
2. The Purpose of Nether Swap
The purpose of nether swap is to shorten the distance between your target and your allies. This skill effectively eliminates any distance your target has covered and puts him in a dangerous situation. As I've said throughout the guide, nether swap will be used as a ganking tool all throughout the game and used to pick off heroes who lagged behind their teammates after losing a team battle or surprising a lone hero who thinks he is not seen.
3. Who do I Swap?
You generally want to swap heroes who are a bigger threat to your team. Late game if a pugna and visage is running away after a team battle, you should swap out the visage so that he loses gold and time farming. It all depends on how valuable your target is and how much your team can handle.
Even though I said in late game team battles you shouldn't use swap to initiate, there are special instances where it is worth it to suicide swap. For instance, swapping a sand king channeling epicenter is definitely worth giving up your life. Swap's ministun takes care of his channeling but if you do it too late, you'll just give him a free blink. The key to stopping sand king is vision. You should always ward up your area before a push or defend. Beastmaster's hawk also works nicely, giving you full vision of what sand king is doing.
There are also a number of instances where a suicide swap is definitely worth it. For instance, if for some reason one of your opponents got a naked rapier, then that rapier is worth more than your life so swap him out and pummel him to death. Make him regret making a naked rapier. It all depends on the situation and the value of your target and yourself. If the opponent can do more than you in team battles then by all means suicide swap him so he can't help his team out. Your survivability is quite good so there is a chance you can live through the focus fire while your target dies off to your teammates.
4. Stun + Swap VS. Swap + Stun
Both of these techniques achieve the same results but based on different situations you must decide on which technique is more effective.
Stun + Swap is more suitable if you are going 1 versus 1. If you swap first then that person will just run away in the other direction but if you stun first you will shorten the gap between you and your opponent while giving a couple of whacks. If they decide to run then swap him to keep him in his place. If they still run away in the other direction chase him and just wait for your stun to cooldown and stun him again. If you have your BOT by this time chasing will be no problem for you. Also use this technique if they are close to you. Don’t be stupid and swap first when you are still in hitting range. Stun first then give a couple of whacks. If they run, that’s when you swap them in. Stun + Swap is generally effective when your swap level is at one since the range is only 100 more than your stun.
Swap + Stun on the other hand is useful when you want to shorten the gap between your victim and your teammates. This is more effective when picking out a lagger who is running away and initiating a team battle. Swap + Stun is effective late game when your swap is level three. The larger distance in nether swap level 2 and 3 allows swap + stun to be more effective than stun + swap.
So in summary only use swap + stun if you have an ally working with you and the opponent is out of hitting range.
5. Tower Swap
Tower swap is simple enough to grasp. The goal is to swap your opponent near your tower. This is very, very effective, particularly early game. Any AGI and INT hero without an escape mechanism WILL die.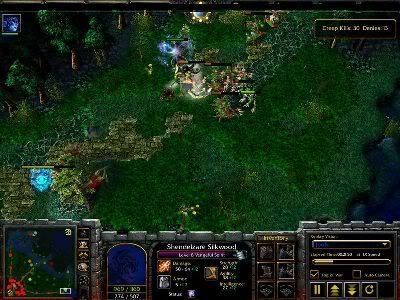
Look at medusa’s HP. Before this encounter, he was at full HP. Swapping him into tower range and stunning him instantly brought him down to less than 40%. I managed to get a few hits in but medusa purged me and ran away. However, I chased him and chained another stun in to give the finishing blow. You might want to remember that early to mid game, chaining two stuns is more effective than trying to hit. Your stun has a ten second cooldown so just chase your target and stun when CD is up. Always remember that your stun isn’t just a normal stun, it’s also a high damage nuke. Take advantage of that.
6. Save Swap
This is simple enough to grasp. Swap your own teammate from harm’s way, stun and run. Only do this if the teammate you are about to save can live through the use of your swap and you are also sure that you can live too. This is VERY useful when your ally is under a channeling spell such as fiend’s grip and dismember.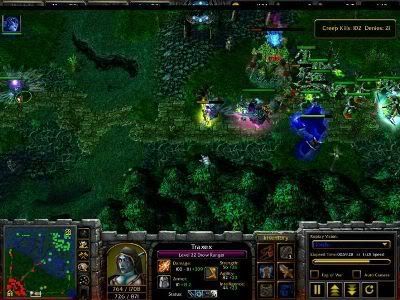
This is a very dangerous situation for drow. He got swarmed by three people while stunned and purged. His HP is dangerously low and the worst part is, he just completed his DR/aegis.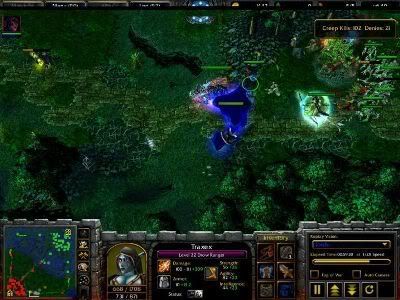
Well thanks to swap, drow gets to save his aegis charge. He makes a clean getaway and I manage to get away by activating BKB and running. What’s more amusing is drow actually kills enigma while they were chasing me. If I had lothars, I would’ve simply ran away while my opponents focuses on our luna backstabbing enchantress and tinker. But activating BKB and drawing attention allowed drow to take out one hero before he retreats. It may not look like it, but this save swap actually proves to be valuable. Drow had to farm up another aegis which means he used up all his charges. If he lost one charge from this incident, he might’ve dropped his rapier later on or forced to play conservatively instead of pushing.
Shendelzare Silkwood, The Vengeful Spirit Dota Heroine, The Guide.
Shendelzare Silkwood, the Vengeful Spirit
Table of Contents
I. Introduction
III. Item Build
V. Using Nether Swap
 Posted in: