

Table of Contents
Introduction
Skills
Skill Build
Item Build
Strategy & GameplayOther Possible Builds
Playing With
Dealing With
Random Facts
Replays
Introduction
Hello all, I decided to make this guide once I saw the obvious lack of Raigor Guides in the forums. He is my favorite hero, and I trust that, once you read my guide, he will be yours too. The making and updating of this guide has taken me an obscene amount of time, and I hope it shows. Read on to find out more about my favorite hero.
HP: 568
HP Regeneration: .9 per second
Mana: 208
Mana Regeneration: .65 per second
Damage: 46-56
Armor: 2
Move Speed: 290
Pros
Compatible with nearly all Heroes
Effective Disabler and Great Stunner
Ultimate with HUGE AoE Potential
Double and Triple Kills can be attained with ease
Cons
Really Slow – There are over 50 heroes who are faster than Raigor.
Low Mana Pool
Other than Stun-and-Run, no escape mechanism
Skills
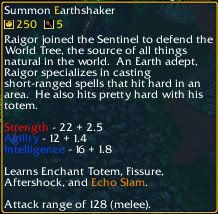
Fissure-Slams the ground with the Raigor's mighty totem, causing the ground to crack in half in front of him, damaging opponents and leaving an impassible trail for a period of time.
Level 1: 125 Damage. 1.00 Second Stun.
Level 2: 175 Damage. 1.25 Second Stun.
Level 3: 225 Damage. 1.50 Second Stun.
Level 4: 275 Damage. 1.75 Second Stun.
Mana Cost: 125/140/155/170
Cooldown: 15 Seconds.
Range: 1000
Author’s Remarks:
This skill is incredibly versatile, with uses ranging from sniping tower-hugging heroes to blocking creeps from attacking your tower. You will be using this spell quite a bit—Learn to love it.
Sniping is one of the finer arts of Fissure, and once you get it down, it won’t leave you. It’s like riding a bicycle. However, don’t expect to master this skill anytime soon. It takes quite a bit of practice until you can 100% guarantee a hit with Fissure from 1000 range away.
Below is a screenshot of how to Snipe a hero.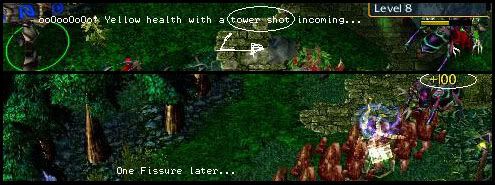
Here we have a Nerubian Weaver at yellow health. Note the Tower’s incoming rock. Automatically you know that if a Weaver’s health is in yellow, and a tower’s rock is about to hit it, your fissure should end up with a kill. Notice it’s path. Is the Weaver moving in zig-zags? Is it moving straight? Is it about to go invisible using Shukuchi? (In this case, it was number 3 and 2. Moving straight in Shukuchi.) Make sure you know where the enemy hero will be before you cast Fissure.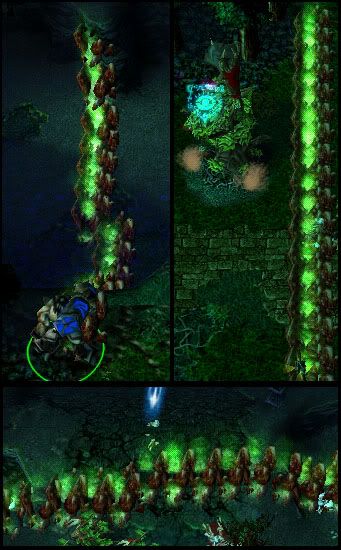
Wallblocking is to use your Fissure as a “wall”. Pretty self-explanatory, I guess. You can cast Fissure at specific locations to suit your needs. If an ally is being chased through the river, you can quickly get to the Cliffside and Wallblock so that the chaser can’t reach your ally. If your tower or base is being pushed, and you need to buy some time until your allies arrive, you can Fissure right in front of the tower or use Fissure to block off the entrance into your base. If you do not understand what I am talking about, refer to the screenshot above this paragraph.
Another thing to note about Fissure: If you click directly on the hero, it’s almost guaranteed to hit. Here is a diagram lovingly drawn by thisisBob, explaining what I am talking about.
it's really weird too, if you click on the hero as target that hero is guaranteed to be hit... I've made a few fissures looking like this:
X = enemy R = Raigor = = fissure path
R===============
X
and X gets hit :blink:
However this has been fixed recently in 6.36 or 6.37. (Beast_Pete)
Enchant Totem-Empowers the totem resting on Raigor's back, causing it to deal extra damage on the next attack.
Level 1: 50% Increased Damage.
Level 2: 100% Increased Damage.
Level 3: 150% Increased Damage.
Level 4: 200% Increased Damage.
Mana Cost: 50.
Cooldown: 7 Seconds.
Author’s Remarks:
As a caster, you mainly use Enchant Totem for the Aftershock damage and stun, as well as the ability to chain into Echo Slam. Also, it buys time until Fissure comes out of cooldown, so that is always a plus. The 200% ED isn’t too shabby either, with the Full Caster Build, the Added Damage (+Green Numbers) comes up to 471. Here’s proof.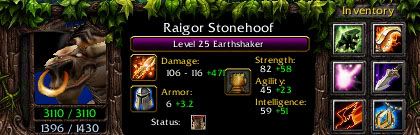

Aftershock-The power of Raigor casting a spell causes the earth to shake below him, dealing additional damage and stunning.
Level 1: 25 damage, .3 second stun.
Level 2: 45 damage, .7 second stun.
Level 3: 75 damage, 1.2 second stun.
Level 4: 115 damage, 1.5 second stun.
AoE Range: About 250.
Author’s Remarks:
MORE STUNNAGE! This skill is the reason you can chain your spells so well.
Aftershock is a lot like the new passive for Zeus. Everytime you cast a spell, something happens. In the case of Zeus, enemies lose a percentage of their current hp. In the case of Raigor, units take damage and get stunned in a small area around Raigor. Below is a screenshot of when the Aftershock graphic is most visible. [Note]-[The ring is only 100 or so units large at this point in the animation.]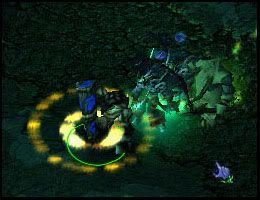
The affected AoE is about 250 units around Raigor, perfect for when you get double or triple teamed. The graphic for this skill is the golden ripple that comes out of the center of Raigor whenever he casts a spell, as seen in the screenshot above.
Echo Slam- Raigor sends shockwaves shooting through the ground, dealing damage ricocheting to nearby targets for additional damage.
Level 1: 200 Initial Damage, 35 Echo Damage.
Level 2: 275 Initial Damage, 45 Echo Damage.
Level 3: 350 Initial Damage, 65 Echo Damage.
AoE Range: About 500
Mana Cost: 145/205/265
Cooldown: 150/130/110
Author’s Remarks:
Suppose there are 2 heroes in front of you. You have a level 3 Echo Slam. When you cast it, 2 waves with 350 damage each will home onto those two heroes and one 65 damage echo will come out of each hero, and that echo will hit the OTHER hero.
Confused yet?
If there are 2 heroes and 4 creeps, SIX waves of 350 damage EACH will home onto each enemy unit, and EACH enemy unit will emit 1 Echo of 65 damage, which proceeds to hit all targets in the nearby area. Kinda hard to explain, you have to watch it to understand completely.
Echo Slam friggin rocks. Lina can’t get a double, triple, quadruple, or penta-kill as easily as Raigor can. Hell, Lina can’t even get a triple kill at all. Lina’s LSA+Slave+LBlade does insane damage on ONE target. Only one easy kill. Raigors F/ET/ES does heavy damage to all targets, an easy double/triple kill.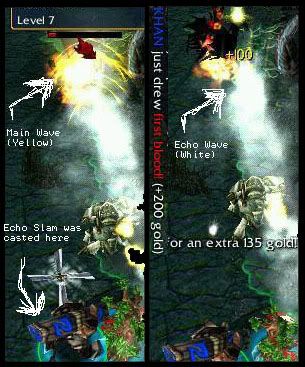
Keep in mind, BOTH the initial waves of damage AND the echo waves home in on their targets.
Since the more targets there are, the more damage you do, you should always start with Echo Slam, right?! WRONG. I started with Echo Slam in this case because, yes, there were many targets, but the main reason was because I KNEW I would get the kill. It is very important to know whether you will get the kill or not. Wasted ultimates suck.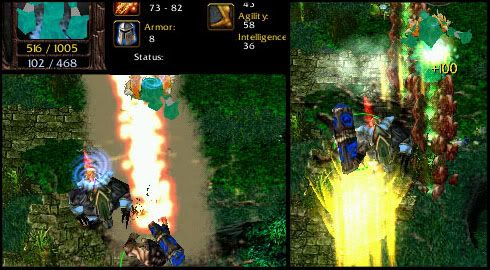
Always check the hero’s health before you use Echo Slam. Once again, wasted ultimates suck. Also keep in mind: When using the F/ET/ES combo in Aftershock range, by level 9, you can kill any hero below 700 hp, and by level 11, you can kill any hero below 1000hp. Score!
Skill Build
So, you understand what the skills do. Now you need the order.
Caster Raigor (The Shepherds)
1. Fissure
2. Stats
3. Fissure
4. Stats
5. Fissure
6. Echo Slam
7. Fissure
8. Aftershock
9. Aftershock
10. Aftershock
11. Echo Slam
12. Aftershock
13. Enchant Totem
14. Stats
15. Stats
16. Echo Slam
17-22. Stats
23-25. Enchant Totem
Fissure allows you to harass, and even get a first blood as low as level 5! 225 (unreduced, and not counting Aftershock damage) damage at level 5 is a healthy chunk of a heros life, and should you catch somebody unawares…
Early stats are for Fissure spamage. Aftershock and Echo Slam are no-brainers. (I hope.)
The reason I get only 1 point of Enchant Totem is because Aftershock sucks at level one and 2, but once you get a level 3 Aftershock, the stun is long enough for you to actually DO something (1.2 seconds). Some get it at level 8, and proceed to level Aftershock up. If I feel that I am in need of an extra stun, I’ll take Enchant Totem a level earlier. It really doesn’t mess the grand scheme of things too much.
Item Build
The Shepherd
Circlet (185)
Mantle of Intelligence (150)
1 Flask (100), 1 Clarity (50)
Complete Null Talisman (175)
Staff of Wizardry (1000)
Void Stone (900)
Robe of the Magi (450)
Complete Eul's Scepter of Divinity
Boots of Speed (500)
Kelen’s Dagger of Escape (2150)
Quarter Staff (1150)
Robe of the Magi (450)
Sobi Mask (325)
Complete Oblivion Staff
Complete Guinsoo's Scythe of Vyse (900)
You may now go in one of 2 directions. [Note]- If you are playing in an IH, where you will be denied, you’ll be happy to know that the cost of Eul’s, Boots of Speed, and Blink Dagger (Which is pretty much all you need) is only around 6000 gold.
The Refreshing Shepherd
Void Stone (900)
Ring of Health (850)
Complete Perseverance
Quarter Staff (1150)
Robe of the Magi (450)
Sobi Mask (325)
Complete Oblivion Staff
Complete Refresher Orb (1850)
Complete Boots of Travel (2200)
TOTAL- 12860 Gold (+Boots of Travel=15060)
With Euls/Guinsoos, and Blink Dagger, few should be able to escape you. Raigor has a good 3 seconds of stun on his own, add Euls, and you have another 5.6 seconds of disable. Or Guinsoos, a 3 second Hex. As they are hexed, your spells are cooling down, and they wont get far before... BAM! Another Fissure kill. Thank you, 1000 range spell. If you feel that they are too far away for your Fissure, blink as far towards them as possible and Fissure.
-Note-
If you plan on using Dagger a bit more expertly, refer to the quote below, taken from the AM guide in the Premium Section.
This is the royal tactic which differentiates pros and good players. Blink-catch means that you do not just blink somewhere in front of your enemy to get 2 hits and than wait for your blink to cool down, you blink exactly in front of the enemy, stopping his movement totally. You get 3 or more hits and the kill should be yours if you repeat these catches. You need to know exactly where your target will be when you blinked. This is very difficult to do but with some experience it works. Of course, you have to include delay in your calculations.
Of course, seeing as you do not have the ability to Blink every 5 seconds, try to make this one count.
The Refreshing ShepherdOnce you get Refresher Orb, it is possible to get a 5-way kill by yourself. This is obviously why I get option 1, rather than going towards Option 2. Here is how the Mega-Death Combo works:
Necronomicon Raigor
--Blink in--
Echo Slam
Enchant Totem
Fissure
--REFRESH--
Enchant Totem
Echo Slam
Fissure
Mana Cost = 90+265+50+170+375+50+265+170+90=1525 Mana.
You know, for a penta-kill, I sure as hell wouldn’t mind spending all of my mana.
-Note-
you will only be able to perform the ENTIRE combo if you get mana-enhancing items such as an Energy Booster. Usually ES/F/ET/Refresh/ES works just as well.
-Note2-
Sobi Mask (325)
Ring of Protection (175)
Complete Ring of Basilius
Ring of Regeneration (375)
Ironwood Branch 2x (57 ea.)
Complete Headdress of Rejuvenation (200)
Boots of Speed (500)
Staff of Wizardry (1000)
Void Stone (900)
Robe of the Magi (450)
Complete Eul’s Scepter of Divinity
Staff of Wizardry (1000)
Belt of Giant Strength (450)
Complete Necronomicon 1(1300)
Kelen’s Dagger of Escape (2150)
Complete Necronomicon 2(1300)
Chainmail (650)
Complete Neztherezim Buckler (225)
Complete Mekansm (900)
Complete Necronomicon 3(1300)
Quarterstaff (1100)
Sobi Mask (325)
Complete Oblivion Staff
Complete Guinsoo’s Scythe of Vyse(900)
Boots of Travel (2200)
TOTAL – 14060 Gold (+Boots of Travel=16260)
Yep. This build totally owns. Its shocking. Necronomicon is the perfect item for Raigor. It gives Intel, Strength, and 2 demon mages which are totally imba. Jeez. I just cant believe I didn’t think of it before. Check the Strategy section and the screenshot below to see how to use this Gem of a Build.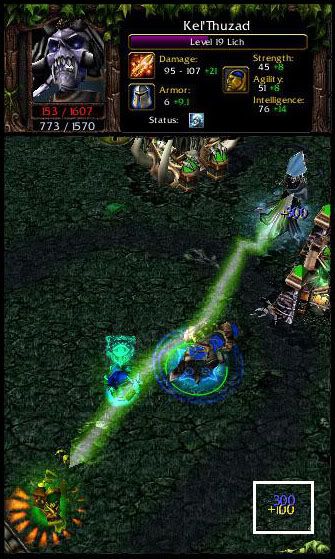
However, it is important to always check the hero’s mana before engaging in combat with a full health hero. If the hero has less than 500 mana, mana burn FIRST. If the hero is smart, he’ll cast all of his spells as fast as possible, in an attempt to minimize the damage from manaburn and maybe turn the tables on you. So. To review. <500 mana =" Mana">500 mana = normal combo.
Blink Dagger vs Lothars Edge
Just for completeness, I believe that I should put in a comparison between the two, so that nobody gets Lothar’s. Cause its horrible.
First, let’s look at the cost of both items.
Blink Dagger = 2150
Lothar’s Edge = 3800
Ok, so Dagger wins in the cost category. Though it might be harder to save up for, instead of being in bits and parts like Lothar’s, it is cheaper by around 1700 gold.
Next, let’s look at how easily each can be countered.
Blink Dagger = Getting tricked into wasting your Blink, and then getting ganked.
Lothar’s Edge = Wards, Necronomicon, Tower-hugging, and a Gem of True Sight.
Now, it’s obvious that countering Lothar’s would be a LOT easier. Now, let’s compare their usability:
Blink Dagger = Blink in from hidden spot, Echo Slam, cause total mayhem.
Lothar’s Edge = WW into a perfect position, Echo Slam, and cause total mayhem.
So, they work the same way pretty much. Problem is, more and more people are finding that Necronomicon is a pretty sweet item, and the True Sight given by one of the Demon Mages renders Lothar’s useless. Also, people use Wards in places you may want to gank them at, so Lothar’s is once again, useless. Tower hugging and a Gem are just two more ways of having your 3400 gold wasted. So.
The verdict:
Blink Dagger wins!
Strategy
Choosing a Lanemate
KotL. Really, that's all you need. However, if on the chance that nobody feels like playing KotL to fuel your madness, then take a ranged hero along with you, preferably one that can harrass well enough for you to get some creep kills up front. The IDEAL lanemate would also have a stun/disable (Atropos comes to mind). Try NOT to get a teammate who is a selfish fart like Lord of Abbadon, or a late-game-no-disable pansy like Bounty Hunter. Having a teammate with a form of disable is priceless, trust me. Makes early-game a cakewalk. Now, onwards to the level-by-level strategy.
Level 1-10
Get your starting items and head out into whichever lane you feel most comfortable with. For Caster Raigor I suggest going into Sentinel Top or Scourge Bottom, seeing as they are closer to the secret shop. For Necronomicon Raigor, I suggest taking Sentinel Bottom or Scourge Top. For Refresher Raigor, whether you go solo or not does not matter. On the other hand, if you are going to play as a Necronomicon Raigor, it is highly suggested that you go with an ally, seeing as they will benefit greatly from your RoB, Headdress and stunning capabilities.
Follow standard melee hero early-game techniques. That is to say, stay around your ranged creep while holding ALT, and only come forth for a last hit. As soon as you get level 3 Fissure, begin harassing your enemy. If he is tower-camping with very low health, wait until you get level 4 Fissure, and then snipe him for an easy FIRST BLOOD! If the fight is all the way at your tower, cast your Fissures so that they hit the hero and kill as many of the remaining creeps as possible. That way your tower gets a shot or two in, and a hit from a tower that early in the game is quite a chunk of life gone.
If you have a partner in your lane, or if you don’t mind the tower taking your kill, hide in the trees until the hero comes close enough for you to trap him between the tower and your Fissure. If you are playing as Necronomicon Raigor, you might have to drop your RoB and Headdress at a safe spot beforehand so that your auras do not betray your presence. Well. That’s really only if you are playing against observant players, ie. Inhouses.
Level 11-16
Around the time you hit level 11 or 12, you should get your Eul’s and almost have your Blink Dagger. It is now mid-game. This is your time to shine. Pick up a Flask and a Clarity, and before you head off into any lane, take a look at the minimap, and then look at which heroes are in which lanes. If there is no immediate threat to any of your towers, then pick a lane with an agility/intel hero, and get your Cyclone Stick ready. Wait for him to come with a full creep wave, and ambush him from the trees or a blindspot (Seeing as you don’t have Blink Dagger just yet) and quickly F/ET/ES. (Remember. Only use Echo Slam when you know you will get the kill.) Or, if your ultimate is on cooldown, simply F/ET/Hit, Cyclone, and when he lands, ET/Hit, and chase until Fissure recharges. If he survives the second Fissure, then Cyclone and proceed with the chase until you get the kill or he gets backup. Here is a screenshot depicting what I am talking about.
While playing with Necrobook Raigor, the strategy while hero-killing changes a bit. First, I use the F/ET/ES combo, Cyclone, Necrobook, and hotkey the mana burner as 1. Then, once the hero comes down, I Enchant Totem (stunned by AS), and beat the hero down together with my minions. I usually use the mana burn as a finisher. Other times I’ll mana burn just as the hero falls from the Cyclone, and then Fissure for a finisher. OTHER times, when my fingers slip up, I use the MB minion as a way to get kills that would have otherwise escaped me. Here is a screenshot of a typical Necronomicon kill.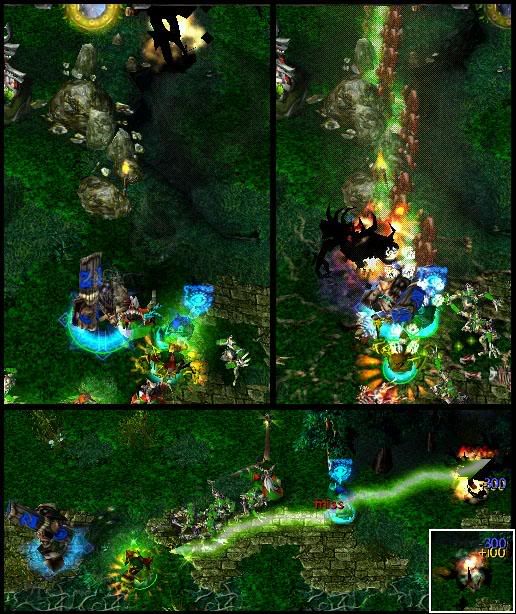
[Note]- Once you have Blink Dagger, skip the whole ambush from a blindspot thing. Just Blink into the hero(es) out of nowhere, and unleash your combo.
While you watch the minimap for lone heroes or 2 agility/intel heroes together, or while you wait for the enemy to respawn, you can farm creeps. Once you have level 4 Aftershock, level 4 Fissure, and at least 1 point in Enchant Totem, you can farm a creep waves in under 5 seconds for free. Simply approach the creep wave, Fissure, Enchant Totem, and pick off the survivors (usually 1 or 2) with a single hit each. By the time you reach the next creep wave, your energy will be completely replenished. Nice, eh?
Level 17-25
Right about now, a lot of the hero-killing craze that goes on during mid-game is dying down, and the game is mainly focusing on pushing and destroying the towers/racks. Perhaps the other team has a Phantom Lancer or a Furion who is pushing multiple lanes, and your team can’t keep up with it. Raigor has the ability to completely DECIMATE ANY kind of push. All it takes is a single Echo Slam. And if that Raigor has Refresher Orb, and this push has 3 heroes, you will probably see a “Triple Kill!” and a “HOLY SHIT!” and a “(Insert Raigor player using my guide) IS BEYOND GODLIKE!”. Woohoo! (Unless of course you were lucky enough to be up against a 5-man push with lots of creeps, in which case you’d see 3 Triple Kills instead of just 1.)
When multiple lanes are being pushed, simply F/ET, and pick off the survivors with 1 hit each. Run to the next lane and finish off that push as well. Unless, of course, if you have Boots of Travel. Then just teleport into whichever lane is being pushed and destroy the creep wave.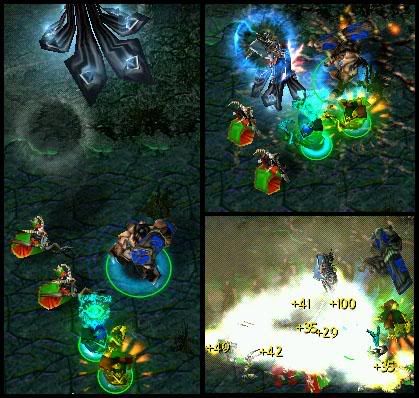
This isn’t to say you won’t find a hero raking in some quick gold so he can meet the recipe cost for his tier 4 item. :) Some doubt the potency of Raigor late game. Well, I’ll admit that it does lower a bit, but that doesn’t mean you can’t kill anymore. Notice in the above screenshot the presence of a full creep wave. Well, you can’t notice it, but the Lich in the above picture is at FULL HEALTH. Full to nil in a matter of seconds. And this is LATE GAME. I cannot stress how important it is to conduct your kills while there are enemy creeps around. It drastically increases your damage from Echo Slam and can make or break a kill.
When playing Necronomicon Raigor, your Mekansm and RoB auras will help out quite a bit during team pushes. The only person who might not be a fan of yours during pushes is CM, because your RoB cancels out her Brilliance Aura. Also, make sure you are using Mek’s 250 AoE heal to its full advantage. Maybe in order to save a failed push, ping a location for you all to meet for the heal. Write something short along with the ping, like “Mek”. That way your allies know where to go, what to do, and why they are meeting there. Mekansm can also be used in the middle of a team battle. The armor buff helps during battle as well, especially combined with the +3 armor from your RoB.
Gameplay
Also remember that fissure can damage units for its 320 damage in a line, and also if they are standing next to each other because of its radius. If units are close to you, they will also get the damage and stun from Aftershock.
If you have Eul's or Guinsoo's, its simple, these just help you to get close, and then eliminate them with Fissure/Enchant Totem/Echo Slam.
Eul's = Cast cyclone and sit below it, then unleash away!
Guinsoo's = Firstly, when using this you should have obtained Kelen's Dagger of Escape. Tele in, and cast the usual Fissure/ET/ES, and when they don't die, use guinsoo and attack/chase them. Fissure again and follow up the combo, and even using tele again to chase them down.
OR, you could tele in there and fissure quickly, followed by the usual ET but this time use Guinsoo before Echo Slam. Hit them some more and then finally use ES. (Use this technique if you think you cant kill them with just the standard F/ET/ES.
Take your much deserved kill.
In cases where you come up against heros who can make illusions, your best choice, no matter what anyone else tells you, is to use Fissure. Fissure at level 4 will destroy any image or at least identify who the real hero is.
Example = When Soul Keeper (Terrorblade) makes his illusions, if he does not have Metamorphosis, all his illusions will be destroyed, if he does have meta when he creates his illusions, his illusion will take far more damage, showing you who the real hero is. Then you can break him easily with your other spells.
It all depends on your opponents hp, and how many creeps there are. If you look at the pictures section, try to find the one with the Sand King kill. You'll notice that I open up with Echo because of the number of creeps (6) + the hero makes 7, and his health being in the yellow made it safe to say that I would get the kill. If you are not sure, then its a toss up. Sometimes you might open the combo with Echo Slam, and then realize that the rest of your combo isn't enough to finish him, resulting in a wasted ultimate. If you Enchant+hit+Fissure+hit, and you realize his health wont go down with the rest of your combo, all you lost is 220 mana. Which is worse, a wasted ultimate AND wasted mana, or just wasted mana?
Playing with
Early-Game Heroes
Ohhhh. This is plain and simple fun. Stunning and mass spammage of cheap nukes early-game go hand in hand like 2 gay men in San Francisco.
Disablers
Having a Disabler as your Ally. Its almost unfair. Probably undefeatable 2v1. Just keep the enemy hero stunned/hexed long enough for you to kill them. Not too hard, Raigor has a good 6 seconds on his own with Guinsoo’s, and if you have a DK with you… If you and a competent Rhasta player are on the same team, then its GG. These two can take down a 3000hp tank in mere seconds. (Excluding Centaur. Damn Return…) Heres how: F/ET/ES, shackles. You beat on the hero and once shackles is up, Sheep him. Enchant will be recharged by now, ET, hit, and Rhasta should voodoo, and you continue to beat down on the hero. Ward Trap. Dead hero.
Nukers
When playing with nukers, use Raigor as a softening up hero. Use F/ET and then Guinsoo them and continue to beat down on the hero while your ally nukes the poor hero to oblivion, only to be Laguna Bladed/FoDed a few seconds later.
Reverse Polarity
Sucking-In moves. Magnataur and Enigma both have them, and they are great when put with your F/ET/ES combo. Why? Because once they are sucked in, they are forced to take Aftershock damage along with Magnataurs Cleave damage. This is the only way I ever have got a quadruple kill.
Other
Support Heroes such as Keeper of the Light and Rooftrellan are simply AMAZING. Illuminate+Fissure is a great snipe-combo, and his Chakra Magic makes sure you never run out of mana. Rooftrellens Overgrowth keeps heros in place long enough for you to get double-triple kills easily.
Heroes with AOE ultimates such as Sand King and C.Maiden work perfectly with Raigor. Expect lots of kills for either your ally or yourself, depending on how you time your Echo Slam. Both of you Blink in, then Epicenter/Freezing Field, then Fissure+Echo Slam. It would be harder NOT to win.
Dealing with
Early-Game Heroes
Best you can do here is tower hug. In early-game, there is a sense of equilibrium, as in midway between the 2 towers. Try to bend and twist it towards yours. Taunt Zeus/Kroebelus with a semi-low hp, and once they get into tower range, Fissure-Snipe them. That way they take your Fissure damage as well as 2 rocks from your tower up their arse.
Silencers
Want one word to sum them up? Annoying. It is impossible to use your combo against Silencer (Last Word). You’d have to just catch him unawares when he has lowish hp and around creeps. Blink in and Echo Slam.
For others like Drow, you should rely on Blink Daggers element of surprise. Hope that they wont be able to silence you before you Blink-Fissure. If you get the first stun in, its all over for em.
Blinkers
They can blink over your Fissures and run away from you with ease. Good thing is that these guys generally have low hp, allowing you to kill them with a single F/ET/ES. Just make sure they don’t come out of stun.
Mana Burners
NA and Magina are the two that come to mind. Also, anybody who uses Necronomicon is also in this list. If the NA is smart, he will mana burn you at every single chance he can get. No Fissure=No Harrasment=Fed NA. Remember that. But. You can try to stay back and Fissure him once he comes too close for comfort. Its best to stun him in tower range. If he is in your lane, ask for a lane switch, hopefully with Naix.
Magina will also burn your mana until its all gone using Blink-Break tactics. Ask for a lane switch when your up against this guy as well. Never go up against a Magina 1v1. His Spellshield allows him to laugh at your combo, and once you finish it, he will mana break you till you have 0 mana and then Mana Void your ass for tons of damage.
Tanks
Going 1v2 against a tank and an agility hero usually spells doom for the agility hero and leaves the tank at around ½ health. But after you get the tank down that much, you really cant do anything else but run away.
Take tanks down with an ally, preferably Rhasta.
Windwalkers
Hmmm. Yeah. One thing you should know. Echo Slam does NOT target Invisible units, but Fissure sure does. So don’t worry if the Clinkz you were pouding on decides to WW away. Fissure in the direction you think he ran, and if you hit him, he will reappear, allowing you to run up and Guinsoo/ET/Echo Slam him before he can do anything about it.
Image Heroes
Do NOT. EVER. Use Echo Slam the SECOND you see like 20 images running at you. Chances are, not ONE of them is the original. Fissure first, check which one took the least damage. If they all took the same amount of damage, none of them are the real one. I'm just repeating this here in case you didn't read the Gameplay Section. But it is VERY important, as Image Heroes aren't usually played by newbies.
Random Facts
Time to recharge 100 mana with no item- 2 minutes 25 seconds
Time to recharge 100 mana with RoB- 1 minute 18 seconds
Time to recharge 100 mana with Void Stone- 1 minute 18 seconds
Time to recharge 100 mana with Clarity- 30 seconds
Weird, huh? RoB may be a feasible starting item for those who like early-game spamming of Fissure. However, Void Stone is used for a recipe, while RoB is not. And RoB provides defense and damage as well, for a cheaper cost. Ah, its a toss up. However, keep in mind that if you get any item that increases your mana, Void Stone gives you higher mana regen.
Raigor’s skill, Fissure, used to be WAY better. At level 4, 320 damage and a 2 second stun. Now its just 275 with a 1.75 second stun.
Raigor’s model is that of a Tauren in the ladder version of WC 3. His casting animation is the same as his only passive, “Pulverize”, in the ladder version.
Replays Raigor_Assist.w3g ( 493.62k ) Number of downloads: 3890 Raigor_GODLIKE.w3g ( 427.16k ) Number of downloads: 8380 Shaker_end_game.w3g ( 305.99k ) Number of downloads: 2514
Raigor Stonehoof-The Earthshaker Dota Hero, The Guide
Raigor Stonehoof-The Earthshaker
QUOTE(thisisBob)
QUOTE(vietpheonix)
blink-catch
QUOTE(DBS)
5) for people who're having a hard time farming and are going the refresher route, you could point out that it is feasible to go for cheaper mana items like three robes and two sobi's until you can develop enough mana/mana regen to harrass properly and farm in peace for the more expensive items. since the three robes and two sobi's all branch of into parts for the sheepstick and refresher they're all viable options. if inventory space becomes an issue get a chicken (the extra inventory slot available near the taverns also helps a lot).
QUOTE(XxYyZz)
Double kills will come easy with this hero. Most likely, when heros double team you, your first incentive is to run! Well, with The Earthshaker, they're in for a surprise. Even if youre taking a hero one on one, use this technique. Get close to them, and cast Fissure and attack once-twice. Then cast Enchant Totem and attack ONCE, then cast Echo Slam and if that didnt kill, hit them, and if their nearly dead, follow them and take advantage of the huge range of Fissure. They won't get far. (This is referred to as the F/ET/ES combo)
QUOTE(DEB)
2) basilus is pretty good on him as a starting item. the extra dmg really helps in last hits and the .65 fixed regen rate remains better then a sobi upto lvl11 (hell basilus actually gives better mana regen then void stone at lvl1!)
 Posted in: